How to create a new Android project – First App Code. Creating your first Android app can be an exciting and rewarding experience, but it can also be intimidating if you’re not sure where to start. In this guide, we’ll walk you through the process of creating a new Android project from scratch and writing your first app code.
Part 1: Setting up Your Development Environment
Before you can start writing code for your Android app, you’ll need to set up your development environment. Here’s what you’ll need:
- Android Studio: This is the official integrated development environment (IDE) for Android app development. You can download Android Studio for free from the official Android developer website.
- Java Development Kit (JDK): Android apps are written in Java, so you’ll need to install the JDK on your computer. You can download the latest version of the JDK from the Oracle website.
- Android SDK: The Android SDK contains all the tools and libraries you’ll need to develop Android apps. You can download the SDK from within Android Studio.
Once you have all these tools installed, you’re ready to create your first Android project.
Part 2: Create a new Android project
To create a new Android project, follow these steps:
- Open Android Studio and click on “Start a new Android Studio project” on the welcome screen.
- Choose a project template: Android Studio provides several templates for different types of apps. Choose the one that best fits your needs.
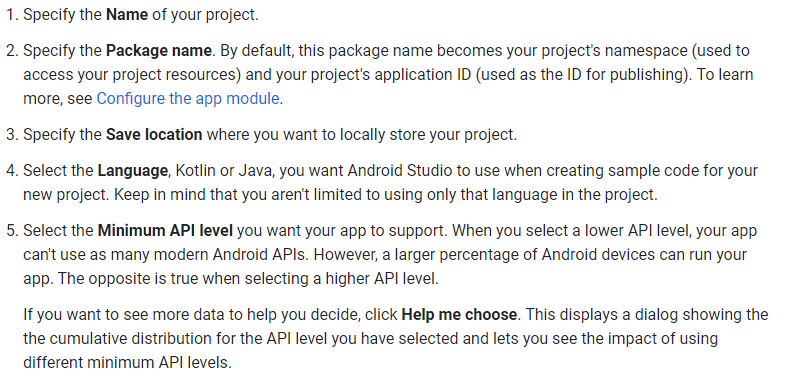
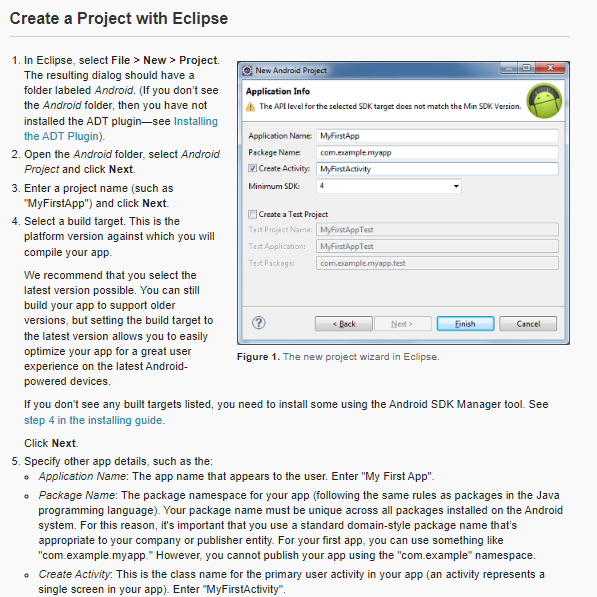
- Enter your app name and package name: Give your app a name and enter a unique package name. This package name is used to identify your app on the Google Play Store and should be in reverse domain name notation (e.g. com.example.myapp).
- Choose your minimum SDK: Select the minimum version of Android that your app will support. This will determine which devices your app can run on.
- Choose your activity: An activity is a single screen in your app. Choose the type of activity you want to start with, such as a blank activity or a full-screen activity.
- Click “Finish”: This will create your new Android project.
Part 3: Understanding the Components of an Android Project
Now that you’ve started to create a new Android project, let’s take a look at the different components that make up an Android app:
- Manifest: The manifest file is an XML file that describes your app’s components, permissions, and other metadata. It’s located in the app/src/main directory.
- Java files: Your app’s behavior is defined in Java files, which are located in the app/src/main/java directory. These files contain your app’s logic and interact with the Android framework.
- Layout files: Layout files define the user interface for your app. They are written in XML and are located in the app/src/main/res/layout directory.
- Resources: Resources are non-code assets that your app uses, such as images, strings, and colors. They are located in the app/src/main/res directory.
- Gradle files: Gradle is the build system used by Android Studio. Gradle files are located in the app directory and define how your app is built and packaged.
Part 4: Writing Your First App Code
Now that you understand the different components of an Android project, let’s dive into writing your first app code. In this example, we’ll create a simple app that displays a message when a button is clicked.
- Open MainActivity.java: This is the main Java file for your app and is located in the app/src/main/java directory.
- Add code to display a message: Add the following code inside the onCreate() method:
java
Button button = (Button) findViewById(R.id.button);
button.setOnClickListener(new View.OnClickListener() {
@Override
public void onClick(View v) {
Toast.makeText(getApplicationContext(), “Hello, World!”, Toast.LENGTH_LONG).show();
}
});
This code finds a button with the ID “button” and adds an onClickListener to it. When the button is clicked, a message is displayed using the Toast class.
- Open activity_main.xml: This is the layout file for your app and is located in the app/src/main/res/layout directory.
- Add a button to the layout: Add the following code inside the LinearLayout element:
xml
<Button
android:id=”@+id/button”
android:layout_width=”wrap_content”
android:layout_height=”wrap_content”
android:text=”Click me!” />
This code adds a button to the layout with the ID “button” and the text “Click me!”.
- Run your app: Click the “Run” button in Android Studio to run your app. You should see a screen with a button that says “Click me!”. When you click the button, a message should appear that says “Hello, World!”.
Congratulations! You’ve just written your first Android app code.
Read also: How to record iPhone screen easily
Read also: How To connect to a Wi-Fi network without any password?
Part 5: Tips for Successful Android Development
Here are a few tips to help you be successful in create a new Android project:
- Use the Android developer documentation: The Android developer documentation is a great resource for learning about the Android framework and best practices for app development.
- Test your app on multiple devices: Android runs on a wide variety of devices with different screen sizes, resolutions, and hardware configurations. Be sure to test your app on as many devices as possible to ensure that it works correctly for all users.
- Keep your code organized: As your app grows, it can become difficult to manage your code. Keep your code organized by breaking it up into logical modules and using good naming conventions.
- Use version control: Version control systems like Git can help you keep track of changes to your code and collaborate with other developers.
- Get involved in the Android developer community: The Android developer community is a welcoming and supportive community of developers who are passionate about Android development. Get involved by attending meetups, participating in online forums, and contributing to open-source projects. You’ll learn a lot and make valuable connections along the way.
Part 6: Conclusion
To create a new Android project can be a daunting task, but with the right tools and guidance, it can be a fun and rewarding experience. In this guide, we walked you through the process of setting up your development environment, creating a new Android project, understanding the different components of an Android project, and writing your first app code.
Remember to use the Android developer documentation, test your app on multiple devices, keep your code organized, use version control, and get involved in the Android developer community. With these tips, you’ll be well on your way to create a new Android project. Good luck!