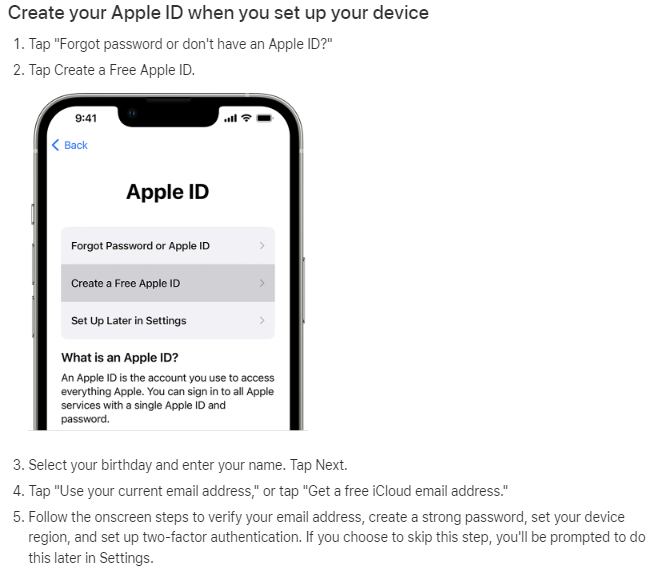
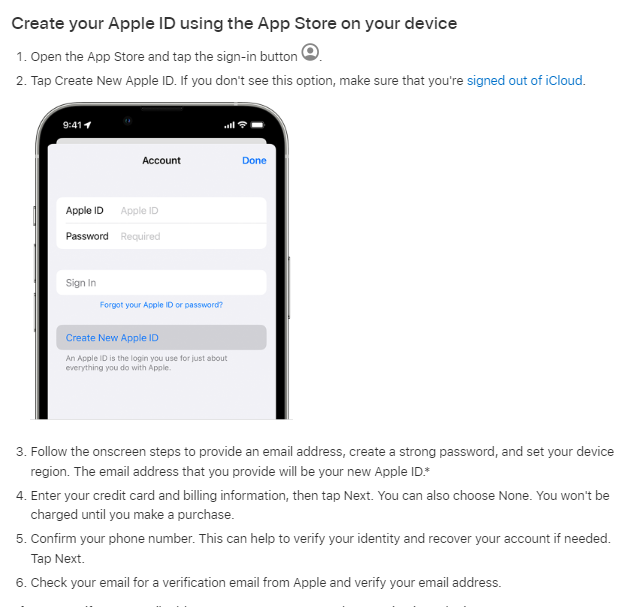
Create New Apple ID
Apple is a technology company that is known for its innovative products and services. One of the most popular services provided by Apple is to create a new Apple ID. An Apple ID is a unique username and password that allows you to access various Apple services, such as the App Store, iTunes Store, iCloud, iMessage, FaceTime, and more. If you’re new to the Apple ecosystem, you will need to create a new Apple ID to take advantage of these services. In this article, we will explore the steps involved in creating a new Apple ID, as well as some tips for keeping your Apple ID secure.

Why Creating a new Apple ID is important?
Before we dive into the steps involved in creating a new Apple ID, let’s take a moment to consider why it’s so important to have an Apple ID in the first place. An Apple ID is a crucial part of the Apple ecosystem, as it allows you to access various services and features that are exclusive to Apple devices. For example, with an Apple ID, you can:
- Download apps from the App Store
- Buy music, movies, and TV shows from the iTunes Store
- Sync your contacts, calendars, and other data across all your Apple devices using iCloud
- Make FaceTime calls and send iMessages to other Apple users
- Set up Apple Pay to make purchases using your iPhone, iPad, or Apple Watch
Without an Apple ID, you won’t be able to access any of these features, which means you’ll be missing out on a lot of the benefits of owning an Apple device.

Read also: Top 7 Ways to send Tmobile text from computer
Read also: What You Need to Know About when does Verizon data reset?
Creating a new Apple ID
Now that we understand the importance of having an Apple ID, let’s explore the steps involved in creating a new Apple ID.
Step 1: Go to the Apple ID website
The first step in creating a new Apple ID is to go to the Apple ID website. You can access this by going to www.apple.com and clicking on the “Sign In” button in the top right-hand corner of the page. Alternatively, you can go directly to the Apple ID website at https://appleid.apple.com.
Step 2: Click on “Create Your Apple ID”
Once you’ve arrived at the Apple ID website, click on the “Create Your Apple ID” button located just below the login form.
Step 3: Enter your personal information
Next, you will be asked to enter your personal information, including your first name, last name, email address, and password. Make sure to choose a strong password that is not easily guessable, and consider using a password manager to help you generate and remember complex passwords.
Step 4: Choose your security questions
After entering your personal information, you will be asked to choose three security questions and provide answers to each one. These questions will be used to verify your identity if you ever need to reset your Apple ID password, so it’s important to choose questions and answers that you will remember.
Step 5: Agree to the terms and conditions
Once you’ve entered your personal information and chosen your security questions, you will be asked to agree to the terms and conditions of the Apple ID service. Take the time to read through these terms and conditions carefully before agreeing to them.
Step 6: Verify your email address
After agreeing to the terms and conditions, you will receive an email from Apple asking you to verify your email address. Click on the verification link in the email to confirm your email address.
Step 7: Add payment information (optional)
Finally, if you plan on making purchases from the App Store or iTunes Store, you will need to add payment information to your Apple ID. This can include a credit card, debit card, or PayPal account.


